

As an Amazon Associate, I earn from qualifying purchases
Introduction (National Geographic Rock Tumbling Instructions)
Engage in a fascinating hobby and create stunning polished stones with the help of National Geographic’s thorough rock tumbling instructions. Whether you’re a beginner or an experienced enthusiast, these instructions will assist you in transforming rough rocks into beautiful, glossy treasures.
Let’s explore the exciting world of rock tumbling and discover the art of crafting unique and exquisite gemstones.
Credit: www.walmart.com
Choosing The Right Equipment
When it comes to national geographic rock tumbling, choosing the right equipment is crucial for achieving successful results. The right tumbler, abrasive grits, polishing compounds, and other supplies play a significant role in the rock tumbling process. Here’s what you need to know about selecting the appropriate equipment for your rock tumbling endeavors.
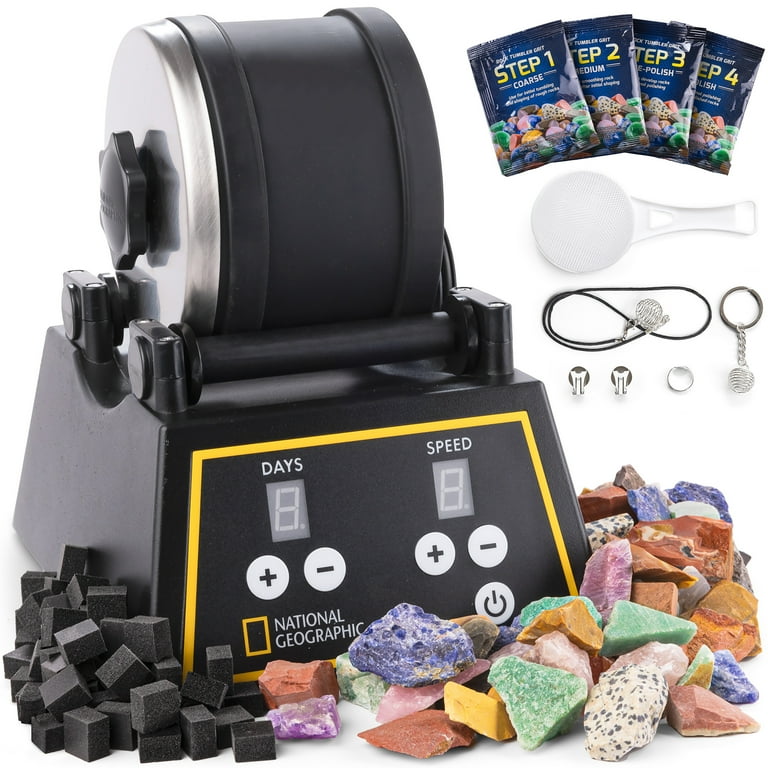
The Tumbler
A rock tumbler is the primary piece of equipment needed for rock tumbling. It consists of a barrel that rotates and tumbles the rocks, gradually smoothing and polishing them. When selecting a tumbler, consider factors such as barrel size, motor power, durability, and noise level to ensure it meets your specific rock tumbling requirements.
Abrasive Grits
Abrasive grits are essential for the initial stages of rock tumbling. These coarse materials help in breaking down rough edges and shaping the rocks. Different grit sizes, ranging from coarse to fine, are used in successive tumbling stages to achieve the desired level of smoothness. It’s important to choose the right abrasive grits based on the hardness of the rocks you intend to tumble.
Polishing Compounds
Polishing compounds are crucial for the final polishing stage of rock tumbling. These compounds help in achieving a shiny and lustrous finish on the rocks. Just like abrasive grits, there are different types of polishing compounds available, each designed for specific types of rocks. Selecting the appropriate polishing compound ensures the rocks attain a brilliant and attractive appearance.
Other Supplies
In addition to the tumbler, abrasive grits, and polishing compounds, there are other supplies necessary for rock tumbling. These include protective gear such as goggles and gloves to ensure safety, as well as measuring tools for accurately determining the amount of grits and polishing compounds required for the tumbling process. It’s essential to have all the necessary supplies ready before starting the rock tumbling procedure.

Credit: www.walmart.com
Preparing The Rocks
When it comes to rock tumbling, preparing the rocks is the crucial first step in the process. By following National Geographic rock tumbling instructions, you can ensure that your rocks are properly sorted, cleaned, and pre-shaped, setting the stage for successful tumbling. Let’s delve into the subheading of ‘Preparing the Rocks’ and explore the necessary steps to get started.
Sorting And Cleaning
- Start by sorting the rocks based on their size and type. Remove any rocks that are too large or unsuitable for tumbling.
- Once sorted, thoroughly clean the rocks to remove any dirt, debris, or unwanted substances using a brush and water.
- Inspect the rocks to ensure they are clean and free from any impurities that could affect the tumbling process.
Determining The Hardness
Determine the hardness of the rocks by using a hardness testing kit or scratch test. This will help you identify the suitable rocks for tumbling and separate them from those that may not be compatible.
Pre-shaping The Rocks
- Before tumbling, consider pre-shaping the rocks by using a hammer or chisel to break off any protrusions or irregularities.
- Pre-shaping the rocks will help promote a more uniform tumbling process and enhance the overall outcome of the polished stones.
The Tumbling Process
Rock tumbling is a fascinating hobby that allows you to transform rough rocks into beautiful, polished gemstones. The tumbling process involves several steps, each of which plays a crucial role in achieving the desired outcome. In this section, we will guide you through the National Geographic rock tumbling instructions, highlighting the key steps involved in the tumbling process.
Step 1: Coarse Grinding
In the first step of the tumbling process, coarse grinding is carried out to remove the rough outer layer of the rocks. This step uses a coarse grit, typically made of silicon carbide, to effectively break down the rocks into smaller pieces and smoothen any sharp edges or uneven surfaces.
To begin, carefully load the barrel of your rock tumbler with the rough rocks and the abrasive grit. Add water to cover the rocks, ensuring that the barrel is approximately two-thirds full. Securely seal the barrel and start the tumbling machine. Allow it to run continuously for around one week to complete the coarse grinding process.
Step 2: Medium Grinding
After the coarse grinding, it’s time to move on to the second step: medium grinding. This step further smoothens and shapes the rocks, helping to refine their appearance. Medium grinding utilizes a finer grit compared to coarse grinding, allowing for more precise and controlled shaping.
For this step, remove the rocks from the barrel and thoroughly clean them, along with the barrel itself. Load the barrel with the cleaned rocks, the medium grit, and enough water to cover the rocks. Seal the barrel securely and run the tumbler continuously for another week. The rocks should gradually become smoother and display improved shapes.
Step 3: Fine Grinding
As we progress through the tumbling process, the third step involves fine grinding. This step utilizes an even finer grit, facilitating the achievement of a glossy and vibrant appearance on the rocks. Fine grinding further removes any imperfections and enhances the overall aesthetics of the gemstones.
Once again, clean the rocks and the barrel after completing the medium grinding step. Load the barrel with the cleaned rocks, the fine grit, and enough water. Carefully seal the barrel and allow the tumbler to run non-stop for approximately one week. During this time, the rocks will undergo further refinement, gradually transforming into stunning specimens with a smooth and radiant finish.
Step 4: Polishing
The fourth step of the tumbling process involves polishing the rocks to achieve a brilliant shine. Polishing enhances the reflective qualities of the gemstones, making them truly eye-catching. This step utilizes a specialized polishing compound, such as aluminum oxide or cerium oxide, to bring out the rock’s natural luster.
Thoroughly clean the rocks and the barrel once again before proceeding to polish them. Load the barrel with the cleaned rocks, the polishing compound, and enough water to cover the rocks. Seal the barrel securely and run the tumbler continuously for about one week. Throughout this time, the rocks will gradually transform into mesmerizing gemstones, radiating a dazzling shine.
Step 5: Burnishing (optional)
While optional, burnishing is an additional step that can be undertaken for further enhancing the rocks’ aesthetics. Burnishing helps to add a smooth, glass-like finish to the gemstones, giving them an even more polished appearance.
If you choose to proceed with burnishing, follow the instructions provided by National Geographic to safely carry out this step. Burnishing typically involves using a burnishing compound, stainless steel shot, and water. The rocks and the required materials are loaded into the barrel, which is then sealed and left to tumble for the recommended duration.
By meticulously following each step of the tumbling process, you’ll be able to witness the remarkable transformation of rough rocks into exquisitely polished gemstones. So, gear up, grab your rock tumbler, and embark on an exciting journey to create your very own collection of beautifully polished treasures!
Final Steps And Tips
Now that you have mastered the basics of rock tumbling with the National Geographic Rock Tumbler, it’s time to focus on the final steps and tips to ensure the best results. In this section, we will cover washing the rocks, inspecting and applying finishing touches, as well as troubleshooting tips for any issues you may encounter. Let’s dive in!
Washing The Rocks:
Before moving forward, it is crucial to wash your rocks thoroughly. This step ensures that any dirt, debris, or loose grit is removed, resulting in a polished and beautiful final product. Follow these steps to wash your rocks effectively:
- Fill a clean bucket or basin with warm water.
- Place your rocks into the water and gently agitate them for a few minutes. This helps dislodge any dirt or grit that may be trapped on the surface.
- Using a soft brush or sponge, scrub each rock individually to remove any stubborn stains or particles. Take your time and be thorough with this step.
- Rinse the rocks under running water to remove any remaining dirt or residue. Ensure that all the washing is done properly to avoid any unwanted scratching during the tumbling process.
- Finally, pat dry your rocks using a clean towel or allow them to air dry completely before proceeding to the next phase.
Inspecting And Finishing Touches:
After the rocks have been tumbled to perfection, take a moment to inspect them closely. This step allows you to spot any imperfections or areas that may require additional attention. Here are some tips for inspecting and applying finishing touches:
- Hold each rock up to the light and examine it from various angles. Look for any scratches, uneven surfaces, or unfinished areas.
- If you notice any imperfections, use a fine-grit sandpaper to smooth out rough spots or touch up specific areas. Be careful not to overdo it; a gentle touch is often all that is needed.
- Wipe each rock clean with a soft cloth or towel to remove any residual debris from the sanding process.
- Once you are satisfied with the appearance of the rocks, apply a coat of polish (such as carnauba wax) to enhance their luster and protect the surface. Follow the instructions provided with the polish for the best results.
Troubleshooting Tips:
Even with careful preparation and execution, occasionally issues may arise during the rock tumbling process. Here are some troubleshooting tips to help you overcome common challenges:
| Issue | Solution |
|---|---|
| Uneven grit coverage | Ensure you are using the recommended amount of grit and check for any obstructions in the barrel that may prevent even distribution. Additionally, rotate the barrel at least once daily to promote uniform results. |
| Loud or unusual noises | Examine the barrel for worn or loose parts. Tighten any screws or bolts as needed. If the noise persists, contact National Geographic Support for further assistance. |
| Cloudy or scratched rocks | Check the quality of the grit used. Additionally, make sure the rocks are adequately cleaned before tumbling and avoid overcrowding the barrel, as this can cause friction and scratching. |
| Tumbling time too short or long | Adjust the tumbling time according to the hardness of the rocks and the desired finish. Experiment with shorter or longer durations until you achieve the desired results. |
By following these final steps and tips, you are well on your way to becoming a rock tumbling expert. Remember to be patient, as the process may take some time, but the end result will undoubtedly be worth it. Enjoy the beauty of your polished rocks!

Credit: www.amazon.com
Frequently Asked Questions For National Geographic Rock Tumbling Instructions
What Are National Geographic Rock Tumbling Instructions?
National Geographic rock tumbling instructions are step-by-step guidelines for using a rock tumbler to polish and enhance the appearance of rocks and gemstones. These instructions include selecting the right rocks, adding grit and water, and gradually polishing the rocks over a period of time.
How Long Does It Take To Tumble Rocks?
The time it takes to tumble rocks can vary depending on the type and condition of the rocks, as well as the desired level of polishing. Generally, it takes around 4-6 weeks to achieve satisfactory results, but some rocks may require longer tumbling periods to achieve the desired finish.
Can I Tumble Different Types Of Rocks Together?
It is generally recommended to tumble rocks of similar hardness and composition together to ensure even and consistent results. Tumbling different types of rocks together may result in uneven abrasion or damage to softer rocks. However, you can experiment with mixing different types of rocks if desired, but it may require additional adjustments to the tumbling process.
How Often Should I Add Grit And Water To The Tumbler?
The frequency of adding grit and water to the tumbler depends on the type of rock and the stage of the tumbling process. As a general guideline, it is recommended to add fresh grit and water every 7-10 days or whenever you notice a significant decrease in the effectiveness of the tumbling action.
Conclusion
National Geographic’s rock tumbling instructions provide a comprehensive guide for beginners and enthusiasts alike. By following these step-by-step instructions, anyone can enjoy the art of rock tumbling and uncover the hidden beauty within various stones. With a focus on safety, technique, and the proper use of equipment, National Geographic ensures that the rock tumbling experience is both enjoyable and rewarding.
So gather your rocks, follow these instructions, and get ready to embark on a journey of discovery!
As an Amazon Associate, I earn from qualifying purchases
